I wish I had time this year to make us some new stockings! Oh well, maybe next year... For those of you who might not think it too late or just want some ideas for the future as well, here are some great ideas for stockings so you can have something to put all those Christmas goodies in!

Retro stockings are so fun and can be as colorful as you want...or not.
Here is a pattern similar to these since I couldn't track down who these were made by.

Quite a few of these patterns are from
redheart.com. Surprisingly they had the most free patterns that were actually cute. Get the pattern for these waiting for Santa stockings
here.
 Granny Square
 Christmas stocking in green.
A lot of you probably have either had something like this when you were little or saw them at your grandparents house. I think they never go out of style yet they are always out of style. haha!

Nothing better than an easy stocking you can whip for for the family!
Here is a quick and easy stocking from
redheart.com that should take you no time!

This stocking is from
crochet and more by simo . The pattern is below in the next two pictures.


Not sure where this is from or who it is by but I can't imagine it would be much harder than some of these other stockings on here.
Can't forget about the paws of the family! I definitely want to make this upper one for our dog Conrad! both patterns are free on redheart. Click
here for the doggy stocking and
here for the cat stocking pattern.

 Just for fun, here are some cute things you can fill your homemade stockings with!
Say hi to Blinky, Inky, Pinky and Clyde! These pacman ghosts are super fun and easy to make, and turns out so adorable that you just want to make another one, and another one! Click
HERE to purchase the pattern.
 Totoro and Friends by hookedhands click here to purchase.

Make your loved ones morning more cozy with this cute mug wrap by
Zukas Scarves & Accessories
Everyone needs a box for something. You can get this pattern by Zoom Yummy here
Cozy that wine bottle you are gifting with a nice homemade wine bottle cozy that you make yourself or purchase from kariscraft
here.
This weeks free pattern is:
A stocking! This is by Lions brand yarn. Click the picture to get info on the colors used.

Lion Brand® Holiday Homespun® GAUGE: 12 single crochet + 14 rows = 4 in. (10 cm). BE SURE TO CHECK YOUR GAUGE. When you match the gauge in a pattern, your project will be the size specified in the pattern and the materials specified in the pattern will be sufficient. If it takes you fewer stitches and rows to make a 4 in. [10 cm] square, try using a smaller size hook or needles; if more stitches and rows, try a larger size hook or needles. STITCH EXPLANATION: | sc2tog (sc dec) Insert hook into st and draw up a loop. Insert hook into next st and draw up a loop. Yarn over, draw through all 3 loops on hook. |
NOTES: Heel begins by working over 20 sts – one half of the total sts of the leg. These are the heel sts. The remaining 20 sts are the leg sts. You will work on the leg sts again later.
In Rows 2 and 3 of heel shaping, you will leave 6 sts unworked at the end of each row.
On Row 4 of the heel shaping, you will work across the same 8 sts worked on Row 3, then sc into the next sc of the row below (this is one of the 6 sts left unworked in Rows 2 and 3). This will add one st to the heel for a total of 9 sts for the heel.
Continue to repeat Row 4, adding one st at the end of each row by working 1 of the unworked sts in the row below until you have 20 heel sts.
Your piece will be a long tube for the cuff and leg, the heel will look like a small cup extending from the leg tube.
Work continues in the round for the foot.
On Rnd 1 of the foot, you will work over the 20 sts of the heel, then sc into the ends of the rows (the side edge of the heel tab), work the 20 leg sts, and sc into the ends of the rows (on the other side edge of the heel), to prepare to work in the round again. |
|
STOCKING
Cuff
With A, ch 40; taking care not to twist ch, join with sl st in first ch to form a ring.
Rnd 1: Ch 1, sc in each ch around; do not join – 40 sc. Place marker for beginning of rnd. Move marker up as each rnd is worked.
Rnd 2: Sc in each sc around.
Rep Rnd 2 until piece measures 4 1/2 in. (11.5) cm from beg; sl st in next sc and fasten off.
Leg
Join B in same st as join.
Rnd 1: Sc in each sc around; do not join.
Rep Rnd 1 until piece measures 14 in. (35.5) cm from beg. Do not fasten off.
Heel
Row 1: Ch 1, turn, sc in first 20 sts (for heel); leave remaining sts unworked.
Row 2: Ch 1, turn, sc in first 14 sts; leave remaining sts unworked.
Row 3: Ch 1, turn, sc in first 8 sts; leave remaining sts unworked.
Row 4: Ch 1, turn, sc in each st across, sc in next sc in row below – 9 sc.
Rep Row 4 until all 20 heel sts have been worked. Do not fasten off.
Foot
Rnd 1: Ch 1, turn, sc in the 20 sts of heel; sl st in side of heel; sc in next 20 unworked sts of leg; sl st in other side of heel; do not join. Place marker for beg of rnd. Move marker up as each rnd is completed.
Rnd 2: Sc in next 20 sts, sk next sl st, sc2tog, sc in next 16 sts, sc2tog, sk last sl st –38 sts.
Rnd 3: Sc in each st around.
Rep Rnd 3 until foot measures 4 in. (10) cm measured from end of heel shaping. Do not fasten off.
Shape Toe
Remove the beg rnd marker. Flatten Stocking and place a marker in the st at center top and in the st at center bottom of foot.
Toe Spiral: *Sc in each sc to 2 sts before next stitch marker, (sc2tog) twice; rep from * until 8 sts remain; sl st in next sc. Fasten off leaving a long tail. Weave the tail through last 8 sts and pull tightly together. Fasten off. FINISHING
Hanger
Join B with sl st at inside back of Stocking, just below top edge of cuff. Ch 12, sl st in same st as join. Fasten off. Weave in ends. Fold cuff to right side. |
|
|
|
 Retro stockings are so fun and can be as colorful as you want...or not. Here is a pattern similar to these since I couldn't track down who these were made by.
 Quite a few of these patterns are from redheart.com. Surprisingly they had the most free patterns that were actually cute. Get the pattern for these waiting for Santa stockings here.
 Granny Square Christmas stocking in green.
 Nothing better than an easy stocking you can whip for for the family! Here is a quick and easy stocking from redheart.com that should take you no time!
 This stocking is from crochet and more by simo . The pattern is below in the next two pictures.
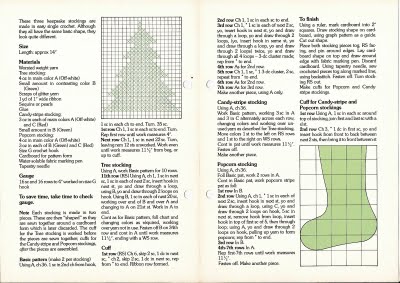

 Not sure where this is from or who it is by but I can't imagine it would be much harder than some of these other stockings on here.

 Say hi to Blinky, Inky, Pinky and Clyde! These pacman ghosts are super fun and easy to make, and turns out so adorable that you just want to make another one, and another one! Click HERE to purchase the pattern.
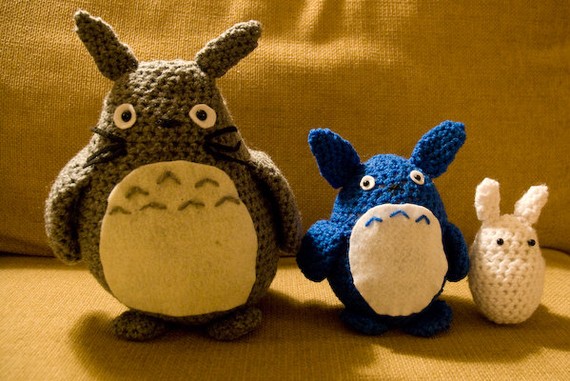 Totoro and Friends by hookedhands click here to purchase.
 Make your loved ones morning more cozy with this cute mug wrap by Zukas Scarves & Accessories
 Cozy that wine bottle you are gifting with a nice homemade wine bottle cozy that you make yourself or purchase from kariscraft here.
No comments:
Post a Comment